Other Post-Installation Steps
Create a Swap File
Our NUC 13 comes with 32GB RAM, but there are other memory configurations available. Regardless, we recommend creating swap.
A swap file is a file on your computer’s hard drive that is used as virtual memory. When your system’s memory is running low, the operating system moves less frequently used data from the RAM to the swap file, making room for more important data in the RAM.
Even with 32GB of RAM, there are certain use cases where having swap is useful. For example, you need swap to let you hibernate the system. It’s also useful if you run lots of services (such as servers and daemons) that are always running.
Unlike Ubuntu, Manjaro does not set up a swap file (or swap partition) as shown in this extract from top.

It’s easy to create and activate swap using the command-line. The first thing is to create and initialize a file to hold the swap. It’s more convenient than using a dedicated swap partition.
The size of the swap file depends on whether you want to use hibernation and the amount of RAM the system has. With 32GB of system RAM, we recommend a 6GB swap file (no hibernation), or 38GB swap file (with hibernation; swap file has to be larger than the amount of system RAM). Let’s create a 6GB swap file. Issue the commands:
$ sudo fallocate -l 6G /swapfile
$ sudo mkswap /swapfile
$ sudo chmod u=rw,go= /swapfile
$ sudo swapon /swapfile
$ sudo bash -c "echo /swapfile none swap defaults 0 0 >> /etc/fstab"
The final command means swap is automatically enabled upon each system boot.
Here’s an extract from top showing our NUC now has swap.

Arch User Repository
For experienced Linux users, one of the compelling reasons to use Arch or an Arch-based Linux distribution such as Manjaro is the Arch User Repository (AUR). The AUR is a community maintained repository consisting of package descriptions (PKGBUILDS).
The AUR makes it easy to install tens of thousands of different programs, great if you like dabbling with open source software. You compile a package from source with makepkg and then install it with pacman. Or you can use Manjaro’s tool pamac, or an AUR helper such as yay.
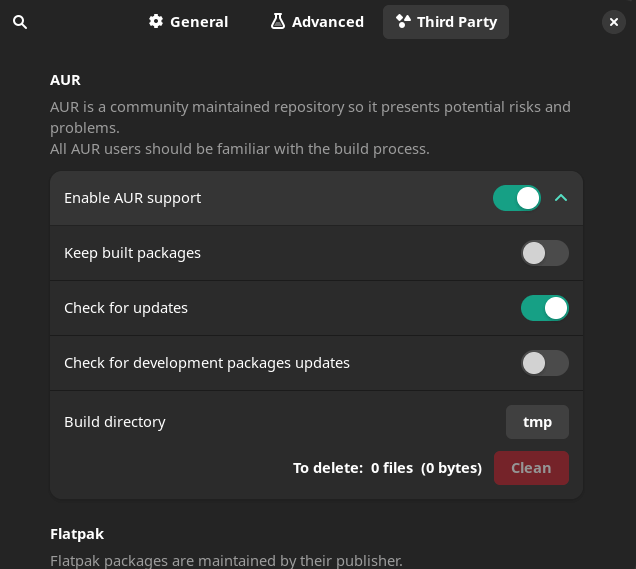
By default Pamac doesn’t have the AUR enabled.
In Pamac, click the three vertical dots, then select Preferences. Go to the Third Party tab where you can enable AUR support. In the image below we’ve enabled AUR support and instructed pamac to check for updates.

Next page: Page 6 – Remove branding
Pages in this article:
Page 1 – Installing Manjaro
Page 2 – First boot
Page 3 – Manjaro Settings Manager
Page 4 – Install Intel iHD graphics driver
Page 5 – Other Post-Installation Steps
Page 6 – Remove branding
Complete list of articles in this series:
| Intel NUC 13 Pro Mini PC | |
|---|---|
| Part 1 | Introduction to the series with interrogation of system |
| Part 2 | Benchmarking the Mini PC |
| Part 3 | Installing Ubuntu 23.10 Desktop |
| Part 4 | Configuring Ubuntu 23.10 Desktop |
| Part 5 | Power Consumption |
| Part 6 | P-Cores and E-Cores |
| Part 7 | Gaming |
| Part 8 | Installing and Configuring Manjaro |
| Part 9 | BIOS options |

I’ve always considered Manjaro to be a somewhat mickey-mouse distro. Any distro that tells its users not to use their GUI package manager for big installs is hard to take seriously. But for beginners, I guess it’s easier than trying to fathom getting everything working in Arch.
While I understand where you’re coming from, that’s harsh criticism in my opinion. I’m a keen supporter of Manjaro. Apart from the odd hiccup with NVIDIA drivers, it’s never interfered with my workflow unlike many rolling distros.